import statistics
import pandas as pd
import numpy as np
import stringLab 1 - Introduction to Python
Introduction
This lab will introduce you to the course computing workflow. The main goal is to reinforce our demo of Python and VS Code, which we will be using throughout the course both to learn the data science concepts discussed in the course and to analyze real data and come to informed conclusions.
Python is the name of the programming language itself and VS Code (via Jupyter Notebooks) is a convenient interface, commonly referred to as an integrated development environment or an IDE, for short.
An additional goal is to reinforce Git and GitHub, the version control, web hosting, and collaboration systems that we will be using throughout the course.
Git is a version control system (like “Track Changes” features from Microsoft Word but more powerful) and GitHub is the home for your Git-based projects on the internet (like DropBox but much better).
As the labs progress, you are encouraged to explore beyond what the labs dictate; a willingness to experiment will make you a much better programmer. Before we get to that stage, however, you need to build some basic fluency in Python. Today we begin with the fundamental building blocks of Python and VS Code: the interface, reading in data, and basic commands.
This lab assumes that you have already completed Lab 0. If you have not, please go back and do that first before proceeding.
Learning objectives
By the end of the lab, you will…
- Be familiar with the workflow using Python, VS Code, Git, and GitHub
- Gain practice writing a reproducible report using Jupyter
- Practice version control using Git and GitHub
- Understand fundamental syntax in Python
Getting started
Clone the repo & start new VS Code window
Go to the course organization at github.com/INFO-511-F24 organization on GitHub. Click on the repo with the prefix lab-1. It contains the starter documents you need to complete the lab.
Click on the green CODE button, select Use HTTPS (this might already be selected by default). Click on the clipboard icon to copy the repo URL.
In VS Code, go to File ➛ New Window ➛Clone Git Repository (under Start).
Copy and paste the URL of your assignment repo into the dialog box Provide repository URL or pick a repository source.
Click lab-1.ipynb to open the template Jupyter notebook file. This is where you will write up your code and narrative for the lab.
Also see similar steps within the Setting up Python page on the course website.
Python and VS Code
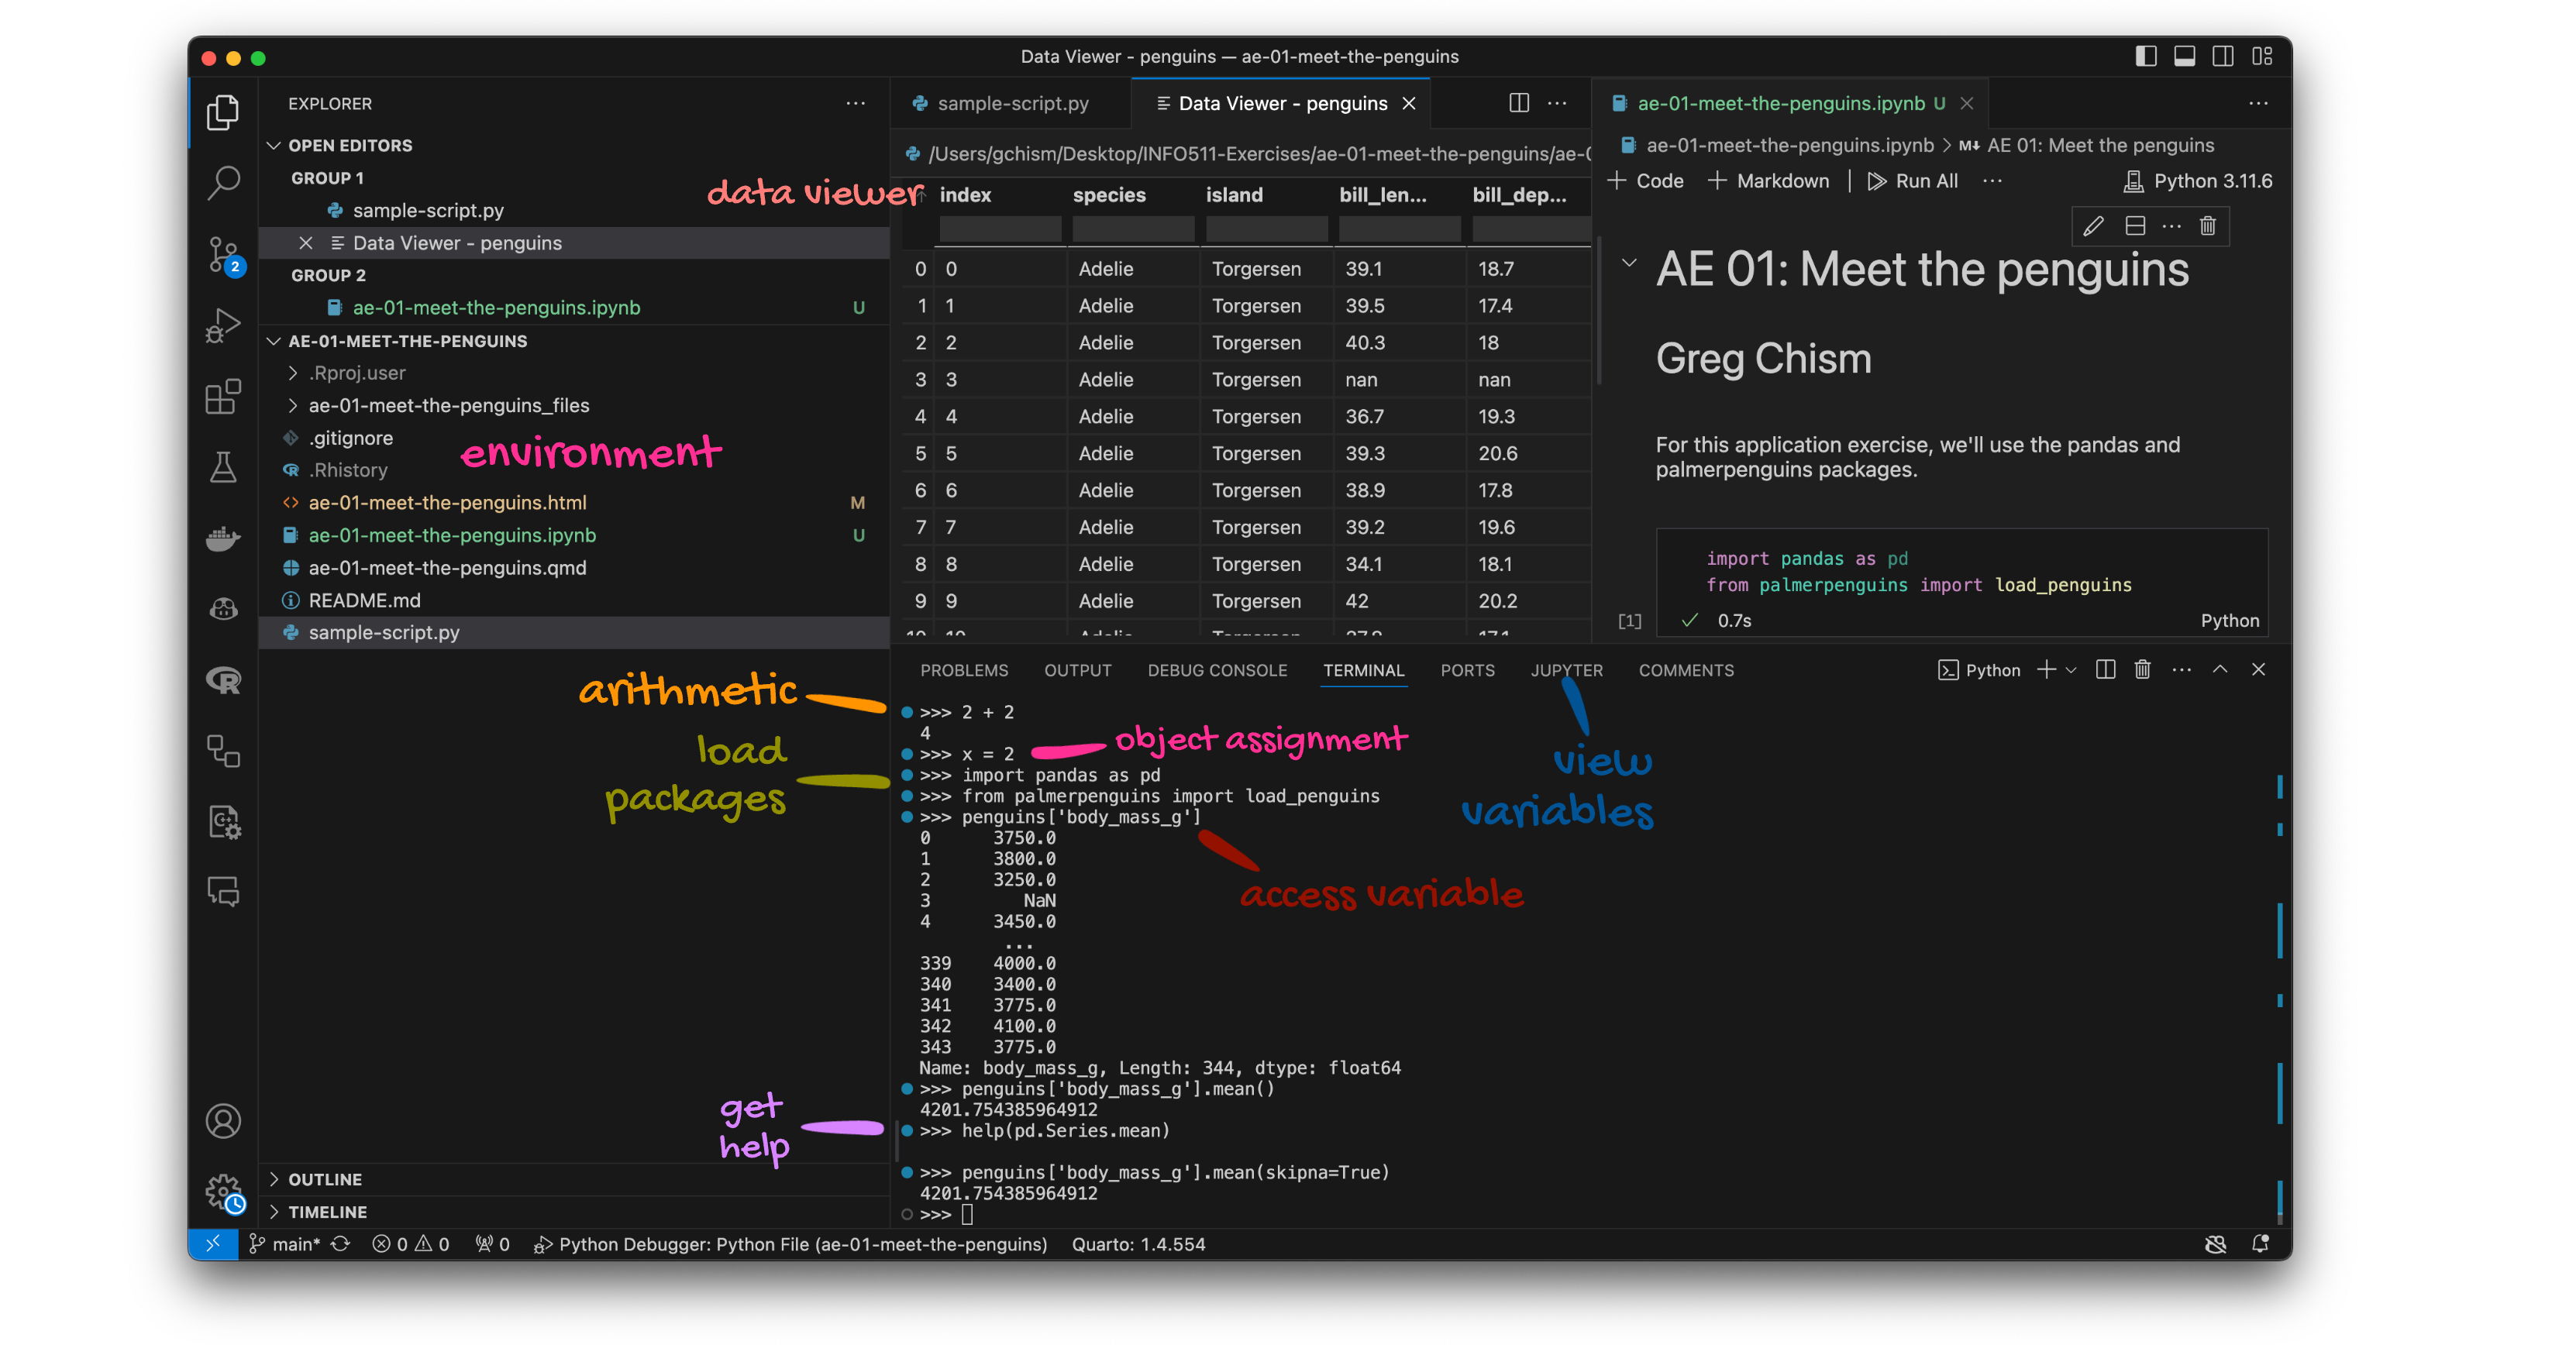
Below are the components of the VS Code IDE.

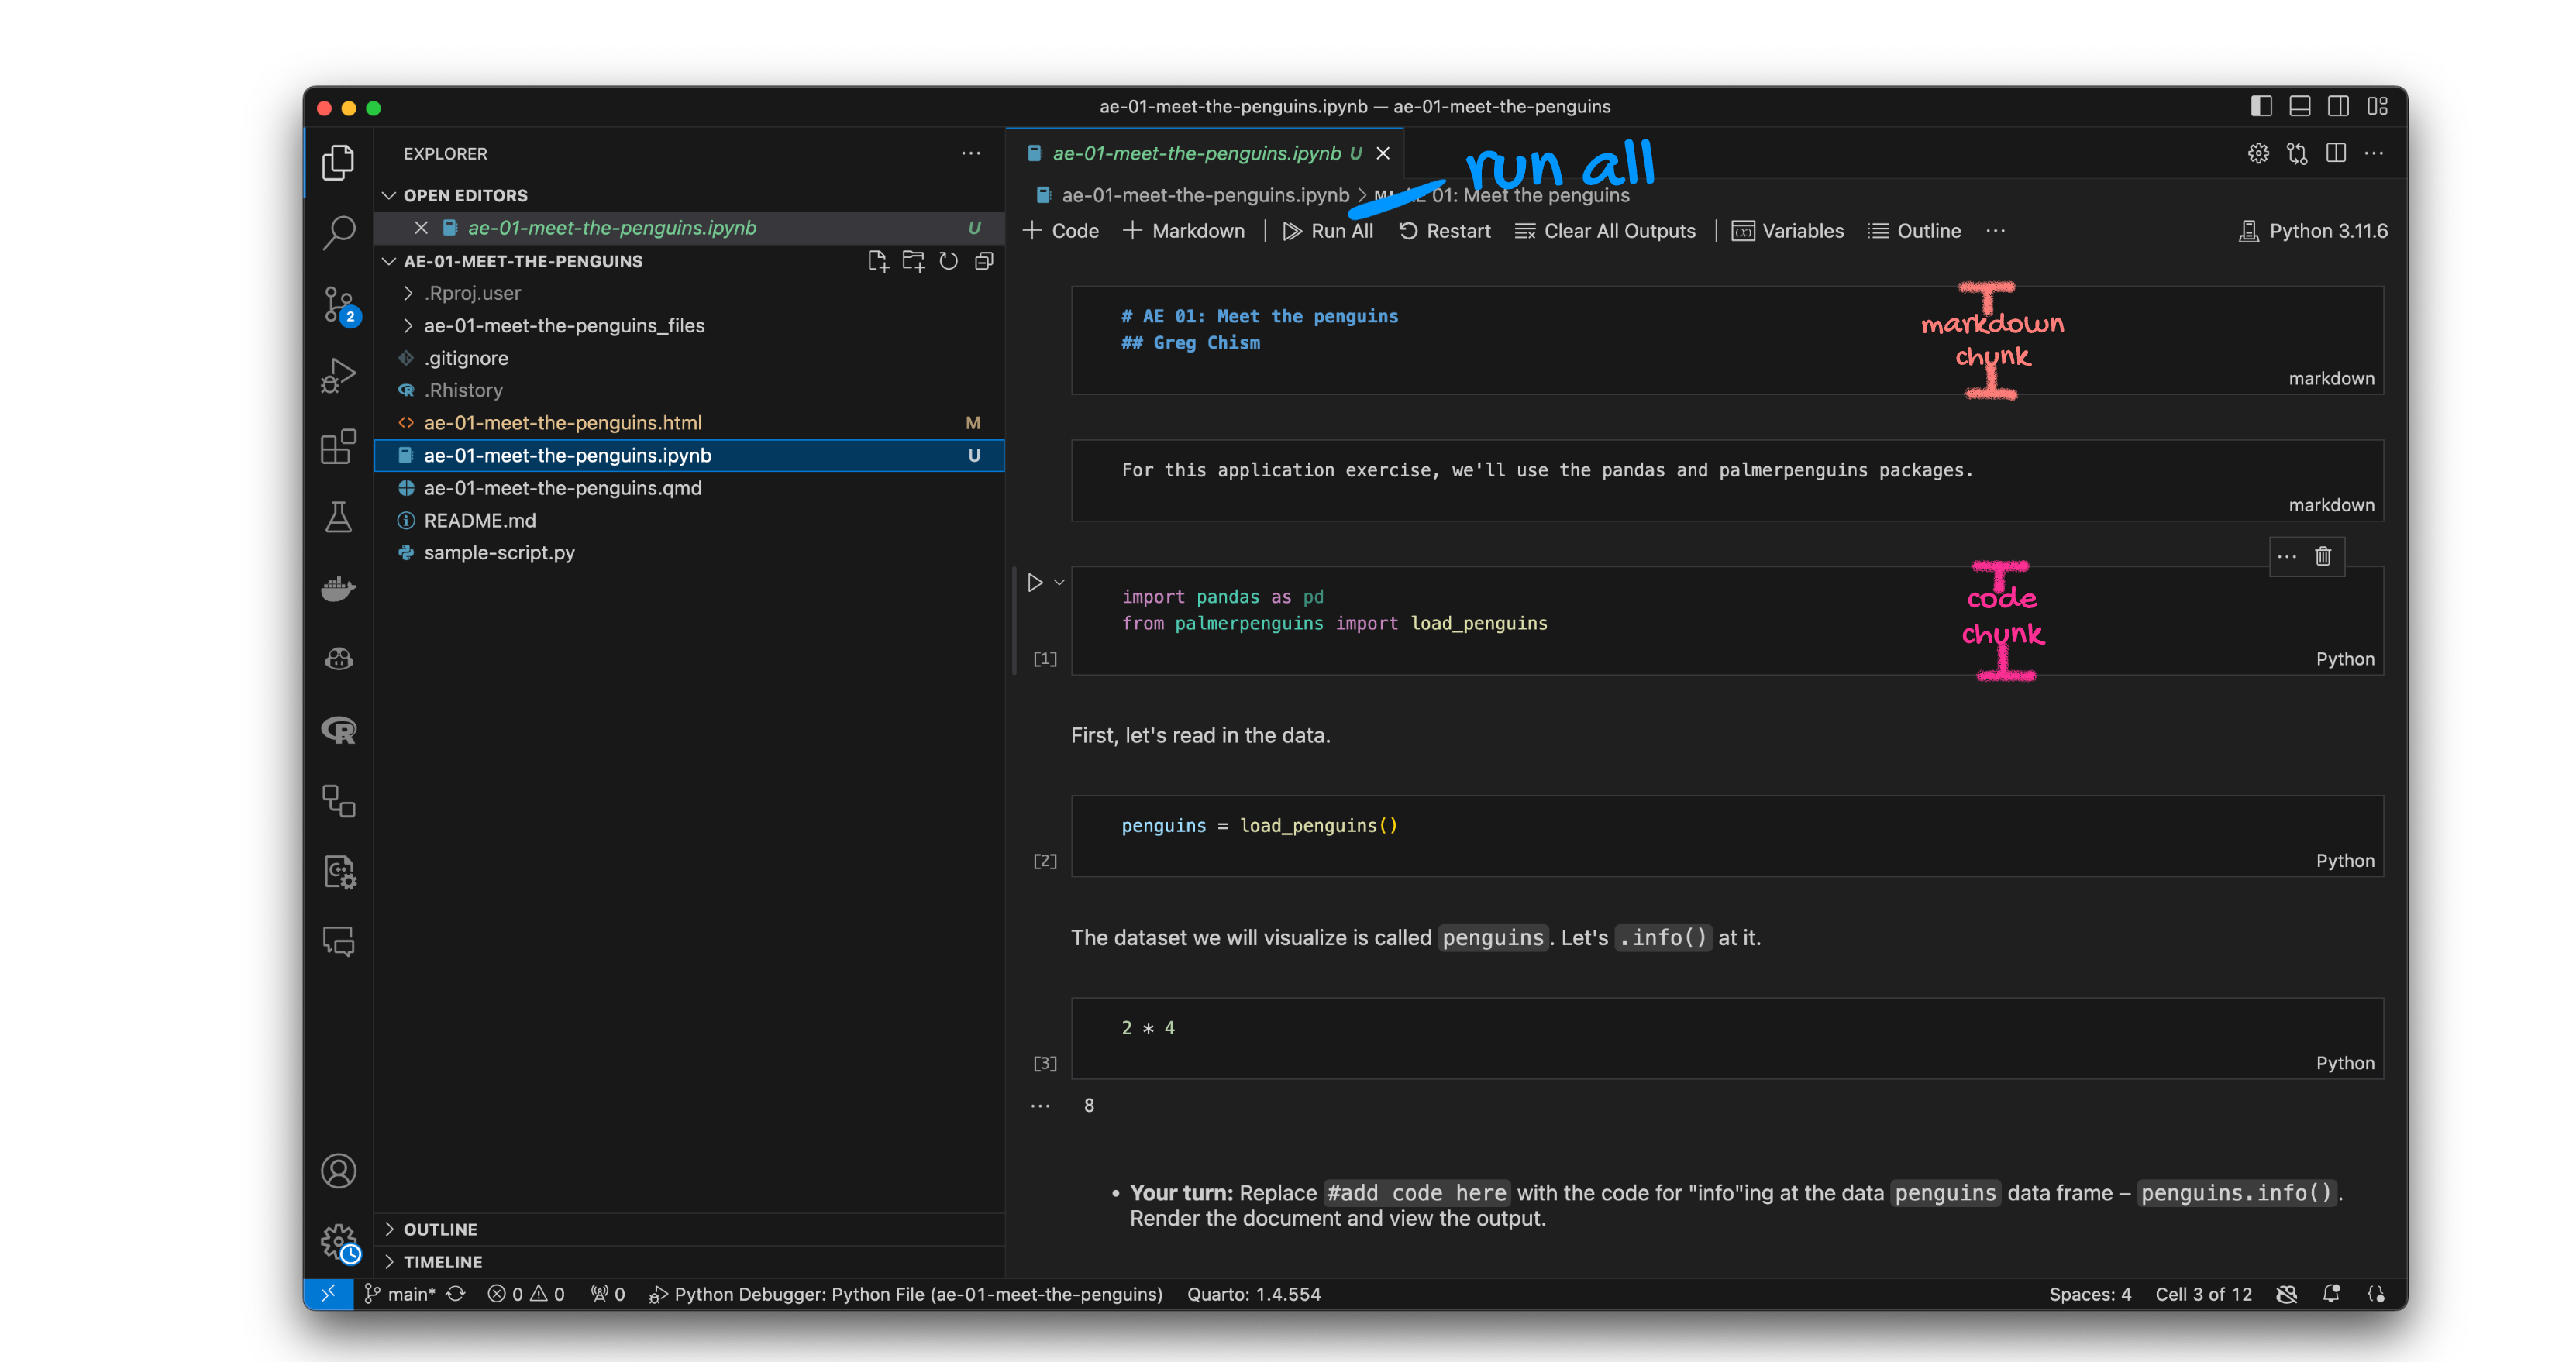
Below are the components of a Jupyter notebook (.ipynb) file.

Open the Jupyter notebook (.ipynb) file in your project, change the author name to your name, and render the document. Examine the document.
Committing changes
Now, go to the Git pane in your VS Code window (third icon on the left - above there is a blue (2) next to it).
If you have made changes to your Jupyter Notebook (.ipynb) file, you should see it listed here. Click on it to see the differences. This shows you the difference between the last committed state of the document and its current state including changes. You should see deletions in red and additions in green.
If you’re happy with these changes, we’ll prepare the changes to be pushed to your remote repository. First, write a meaningful commit message (for instance, “update author name”) in the Message box. Finally, click Commit. Note that every commit needs to have a commit message associated with it.
You don’t have to commit after every change, as this would get quite tedious. You should commit states that are meaningful to you for inspection, comparison, or restoration.
In the first few assignments we will tell you exactly when to commit and in some cases, what commit message to use. As the semester progresses we will let you make these decisions.
Now let’s make sure all the changes went to GitHub. Go to your GitHub repo and refresh the page. You should see your commit message next to the updated files. If you see this, all your changes are on GitHub and you’re good to go!
Pushing changes
Now that you have made an update and committed this change, it’s time to push these changes to your repo on GitHub.
In order to push your changes to GitHub, you normally must have staged your commit to be pushed. click on Push. On VS Code however, the staging step has been done for you.
Packages
In this lab we will work with the numpy and pandas packages, which is a collection of packages for doing data exploration and analysis in Python.
Run All in the document which loads these packages with the import function.
Guidelines
Remember that continuing to develop a sound workflow for reproducible data analysis is important as you complete the lab and other assignments in this course. There will be periodic reminders in this assignment to remind you to Run all, commit, and sync your changes to GitHub. You should have at least 3 commits with meaningful commit messages by the end of the assignment.
Questions
Python Basics
Question 1: Variables and Types
Define two variables: an integer named
agewith a value of 25 and a string namedcoursewith the value “Data Mining”.Print their values and types using the
type()function.
# add code here.Run all, commit, and sync your changes to GitHub with the commit message “Added answer for Question 1”.
Make sure to commit and push all changed files so that your Git pane is empty afterward.
Question 2: Control Structures
Write a function
is_prime(num)that takes an integer and returnsTrueif the number is a prime number,Falseotherwise.Include a loop and an appropriate control flow statement to check for primality.
# add code here.Run all, commit, and sync your changes to GitHub with the commit message “Added answer for Question 2”.
Make sure to commit and push all changed files so that your Git pane is empty afterward.
Question 3: Data Structures
Create a dictionary named
student_gradeswith keys as student names and values as their grades (A, B, C, D, F).Write a loop to print out each student’s name and grade in the format: “Student [Name] has grade [Grade]”.
# add code here.Run all, commit, and sync your changes to GitHub with the commit message “Added answer for Question 3”.
Make sure to commit and push all changed files so that your Git pane is empty afterward.
Question 4: List Comprehension & Functions
Using list comprehension, generate a list of tuples where each tuple is
(number, square of number)for numbers between 1 and 10.Write a function
calculate_stats(numbers)that returns the mean, median, and standard deviation of a list of numbers. Utilize functions from thestatisticsmodule.
# add code here.Run all, commit, and sync your changes to GitHub with the commit message “Added answer for Question 4”.
Make sure to commit and push all changed files so that your Git pane is empty afterward.
NumPy Introduction
Question 5: NumPy Arrays
Create a NumPy array
Aof shape (10,10) with values ranging from 0 to 99.Calculate the determinant of matrix
A(usenumpy.linalg.det). Print the result.
# add code here.Now is another good time to Run all, commit, and sync your changes to GitHub with a meaningful commit message.
Once again, make sure to commit and push all changed files so that your Git pane is empty afterwards.
Question 6: Array Operations
Given a 1D NumPy array of size 10, normalize it (i.e., scale the values to range between 0 and 1).
# add code here.Now is another good time to Run all, commit, and sync your changes to GitHub with a meaningful commit message.
And once again, make sure to commit and push all changed files so that your Git pane is empty afterward. We keep repeating this because it’s important and because we see students forget to do this. So take a moment to make sure you’re following along with the version control instructions.
Question 7: Extract and Print Elements
Extract and print all the elements from the third column of a given 2D NumPy array.
Use a for loop to iterate through each element of this column and print their square roots.
# add code here.Run all, commit, and sync your final changes to GitHub with a meaningful commit message.
Make sure to commit and push all changed files so that your Git pane is empty afterwards.
Pandas Introduction
Question 8: Series and DataFrame Basics
Create a Pandas Series with the labels as the first 10 letters of the alphabet and the values as random integers from 1 to 100.
Convert this Series into a DataFrame with the column name
Random_Numbers.
# add code here.Question 9: Data Importing and Inspection
Load a CSV file into a Pandas DataFrame. The CSV has columns
id,name,score.Print out the data types of the columns and the first 10 rows of the DataFrame.
# add code here.Question 10: Data Manipulation and Cleaning
Data Manipulation and Cleaning:
Replace all instances of a missing ‘score’ with the median score.
Add a new column ‘score_normalized’ that contains the ‘score’ column normalized to have a mean of 0 and a standard deviation of 1.
# add code here.Its okay if you don’t get this last question 100% correct. We will cover this thoroughly in the following weeks.
Wrap-up
Submission
Before you wrap up the assignment, make sure all of your documents are updated on your GitHub repo. We will be checking these to make sure you have been practicing how to commit and push changes.
You must turn in the .ipynb file by the submission deadline to be considered “on time”.
Make sure you have:
- attempted all questions
- run all code in your Jupyter notebook
- committed and pushed everything to your GitHub repository such that the Git pane in VS Code is empty
Grading
The lab is graded out of a total of 50 points.
On Questions 1 through 10, you can earn up to 5 points on each question:
5: Response shows excellent understanding and addresses all or almost all of the rubric items.
4: Response shows good understanding and addresses most of the rubric items.
3: Response shows understanding and addresses a majority of the rubric items.
2: Response shows effort and misses many of the rubric items.
1: Response does not show sufficient effort or understanding and/or is largely incomplete.
0: No attempt.
